
For any washing machine to function properly, the flow of hot and cold water needs to be controlled. This is where shut off valves for washing machines come in handy.
A good shut off valve will be able to control the inflow of water to make sure your washing machine gets just the right amount of water needed.
Top 3 - Washing Machine Shut Off Valves
Preview | Product | Price |
|---|---|---|
 | ||
 | ||
 |
Issues with Faulty Valves
Some issues can arise if a shut off valve is not installed properly or needs to be replaced. The most common problem is your washing machine flooding.
This indicates the valve and its sensor are not working properly. It should automatically shut off once the water level reaches a certain amount.
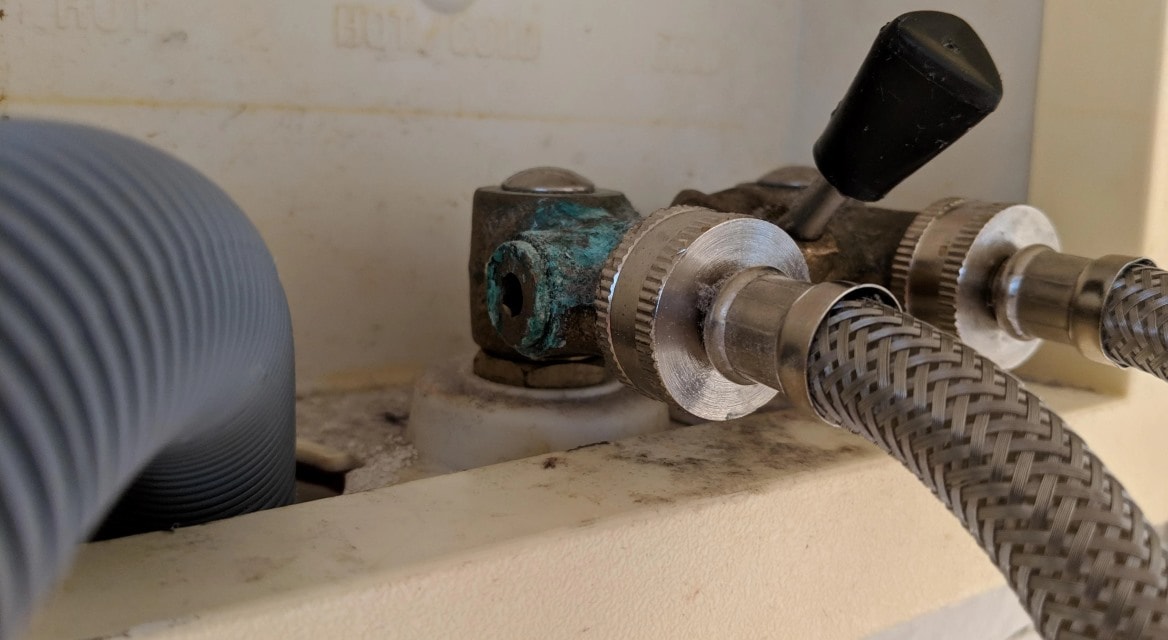
Another problem is either the hot or cold valve leaking from the spigot, which can cause water to drip down and damage your wall and floor behind the machine. If this isn’t noticed in time, it can lead to costly repairs.
Most Reliable Shut Off Valves for Washing Machines
1. Mueller B & K Shut Off Valve
This type of valve is called a single lever washing machine valve because the lever in the middle will control the flow of both the hot and cold water. There are ball valves fitting in the ringlets so the transition is smooth when shutting off or turning on the water.
It’s important to note that even though the Mueller B & K is a single lever valve, it does not mix your hot and cold water, it simply controls them both at the same time. This is important because it eliminates the need to cap one side when not in use.
It is made of brass so it’s a tad bit bulkier but it’s also more durable (the material of your valve matters - more on this later). The pricing is also reasonable when compared to other valves on the market.
Installation should take about 20 minutes though it is noted you may need to purchase additional screws. This valve is also ANSI compliant. ANSI stands for the American National Standards Institute which helps to ensure quality consumer products, so you know you are getting a reliable item.
2. Watts 175C Valve
This is another single lever shut off valve that controls both the hot & cold water lines, but it is made of bronze. Bronze is naturally more resistant to corrosion so the overall lifespan of this valve is extended beyond its competitors.
The Watts 175C has a high water pressure rating (200 PSI) and a high water temperature resistance so the valve will stay intact, even if you choose not to solder it to the existing spigots. The inlets can also be rotated easily so they can face inwards or outwards.
One of the best features of this valve is the ease of replacement. The center-to-center distance between the inlets is 2 ⅜ “ (which is standard in most homes). So the only installation steps are removing the old valve screws, taking out the old valve, and screwing in the Watts 174C valve.
There is no need to solder new elbows & installation should take less than 10 minutes. Also, the warranty guarantees a well performing product or a total replacement.
3. Shark Bite Angle Valve
This individual fitted valve (one for hot and one for cold) is specifically designed for quick and easy installation. Considered a “push-to-fit” valve, all you need to do is simply insert it onto your existing connection & then attach the lines.
There is no tape, putty, or soldering needed for this Shark Bite Angle Valve. Just press the valve into the existing line to create a watertight seal. It can be used in a variety of angles as well, so it will fit most existing plumbing fixtures. Perfect for all the DIY-ers out there!
It can also be removed & reused up to 4 times while still maintaining its quality. It’s as easy to remove as it is to install. If there is an issue with fitting them into the valve dugout, it’s recommended you purchase the Shark Bite pipe cutter & burr smoothing tool to ensure a good fit.
4. Watts Duo-Cloz ½ Inch Valve

This is a single lever shut off valve, also called a “duo close” by the company. An important feature of this valve is that it helps to minimize an effect called water hammer by providing a throttling feature.
Water hammer is something that happens when the flow of water is suddenly halted. The pressure from the once flowing water will push against the valves slightly once it is turned into the off position. If this happens too often, it can degrade the integrity of the seal and cause leaks.
One thing to note about this Watts Duo-Cloz valve is that some additional materials may be required for installation. The company recommends using teflon tape around the new threads in order to make sure the seal is watertight.
Also, this is a direct replacement for a popular brand called Oatey valves. Oatey valves are usually installed in older houses.
5. Hydro-Master Valve

This Hydro-Master single lever lead-free brass valve is considered universal and will fit most washing machine fixtures. It’s not rated as high for water pressure, only 125 psi compared to some valves which can handle up to 200 psi, but 125 psi is the standard for most fittings.
Its price point makes it a more affordable option as well, along with its ease of installation. Most consumers state it takes them no more than 10 minutes to replace their old faulty valve.
The pipe joints are already soldered on the inside so there’s no need for specialty equipment. Overall, this is a good, cost-effective option for an average homeowner with little plumbing experience because the valve is ready to be installed right out of the package.
6. Watts Intelliflow with Wall Box

Oh, the benefits of living in the 21st century. If you want a washing machine shut off system that does all of the work for you and gives you peace of mind, look no further than this Watts Intelliflow system.
The measurements for the fittings are the typical sizes (½ inch thread). But there are a few added features that make this fitting stand out.
For starters, there is a sensor box that you can connect to your phone. This will give you text messages updates about the status of the water going to your washing machine, such as a hose bursting. If it senses a problem, it will automatically shut off.
Also, there is an added layer of protection with a floor level flood sensor that you place behind your machine. This will automatically shut off the flow of water should it detect a leak.
Extra care needs to be taken when installing this system because it uses electricity as well as water. So avoid the risk of electric shock & follow all instructions exactly when you are installing.
How to Replace Your Shut Off Valve

Even if you have never done any kind of plumbing before, most shut off valve installations are fairly easy & can be done by first-timers.
Shut Off All Water
You want to avoid any water spewing out of your pipes while you are trying to replace your valve. Locate the main water line to your house & shut it off. There are two common locations for main water shut off.
It could be near a garden hose spigot near the front of the house, usually discernable to a larger box surrounding it. It could also be near the edge of your property close to the curb underneath a place “cap” in the ground.
Gather Your Tools

Most valve replacements should require minimal tools. You will most likely need a wrench that can fit around the current bolts and a screwdriver to detach & reattach the valves.
Some people like the extra security of teflon tape around threads to ensure a waterproof seal. It’s also not a bad idea to purchase extra o-rings should you find the quality of your current ones to be degraded.
Disconnect Hoses & Drain
Remove the hoses that connect to your current valve. Then take a small tupperware container or a bucket and open up both the hot and cold valves to drain any remaining water that was left in the pipes after you shut off the water.
Note: Some manufacturers claim their valves can be installed either wet or dry, but it is always much easier to install on dry valves.
Remove & Replace
Using your wrench, loosen the adapter to both the hot & cold water valves. Once you pop off your old unit, double check the integrity of the underlying components. Dry the pipes off with a rag to remove that last bit of water & make installation easier.
Follow the manufacturer's instructions for installing your new pieces. It should be as easy as popping it right on the existing pipes.
Reconnect & Check for Leaks
Once you’re sure your new valve is fitted properly, reconnect your hoses, test the mechanics of the valves (on/off) and turn your main water line back on. After you have turned your water back on, turn both the hot and cold valves on and check for any leaks.
Any leaking water indicates that there are components to the valve that are not tight enough & you’ll need to go through and double check your work.
Tips For Installation

Check Your Thread Length & Spacing (for Single Lever Valves)
The most common thread length for washing machine shut off valves is ½ inch. However, some valves may need a longer thread so be sure to double check what you have installed already so you get the proper replacement.
If you opt for a single lever valve, make sure the spacing between the two inlets matches with what is currently installed as well. It’s much easier to purchase a new valve than it is to move your pipes and spigots.
Keep Your New Valves Protected
An important tip from many professional plumbers is to leave your valve inside its packaging until the moment you are ready to install it. This will help to prevent any random dirt or debris from entering the threads (if there are any).
Even the smallest amount of debris can affect the fit of the threads. While this can’t always be avoided, do your best to mitigate it.
Work Smarter Not Harder
Some new shut off valves may require you to solder them to existing joints. Even though this isn’t a bad idea, it is not always feasible for the layman installer.
Whichever valve you decide to go with (even ones not on the list), make sure you don’t need any specialty tools to install it or else your project will take longer & require more finesse.
Know When to Call a Professional
As much as us DIY-ers like to take on projects ourselves, there are some instances where we really need a helping hand from the experts.
Unexpected specialty tools may be needed, or you may have to replace severely corroded parts once you remove your old valve. Sometimes these issues can be foreseen, and sometimes they can’t.