
Removing a shower handle isn’t a project most people encounter very often. Typically, bath fixtures last over 20 years – meaning their replacement seldom happens unless it’s time to update the bathroom or the fixture breaks.
Replacing a shower handle doesn’t take much work, but it can seem frustratingly tricky if the screws holding it in place aren’t visible.
Many shower handles feature hidden screw designs for a seamless appearance. Removing the shower handle is mostly a matter of accessing the hidden screws. In most cases, all it takes is popping off a cover to find the screws.
Whether you’re looking to update your shower fixtures or need to replace a broken shower handle, the following steps will help you efficiently remove a shower handle with hidden screws – and will cover helpful tips and tricks for your shower handle project.
Table of Contents
How Long Does It Take to Remove a Shower Handle?

Most shower handle removals take under an hour, however, the length of the project depends on why you need to remove the fixture.
You can expect a more extended project if you need to remove the handle due to damage to the handle or the shower area around it.
On the other hand, if your shower handle is in good shape and you want to update the fixture for aesthetic reasons, the project usually won’t require as much time.
Tools You Need to Remove a Shower Handle (With or Without Screws)
You can find most tools required for removing a shower handle in any hardware store or through online retailers like Amazon. Most shower handle projects require the following tools and materials:
- Flathead Screwdriver – a thinner head will usually work better to pop off covers on the shower handle.
- Allen Wrench – the size of the wrench will vary based on the design of your shower handle. Using a multi-headed wrench like this can save you time looking for the correct size in the toolbox.
- Calcium and Rust Removing Spray (like this one from Amazon)
- WD-40 – it’s not always necessary, but it can help to loosen up stiff screws.
- Work Gloves – safety first, especially in areas prone to rust.
- Safety Glasses – accidents happen. It’s always best to wear eye protection for household repairs.
- Old Shop Clothes or Towels.
How to Remove a Shower Handle Without Visible Screws
1. Turn Off the Water Supply
If you’re removing a shower handle with the screws not visible, you’ll start the project as you would any plumbing-related work by turning off the water supply.
Usually, the water supply line sits underneath the bathroom sink. In some modern apartments with a false (drop) ceiling in bathrooms, water valves remain hidden within the false ceiling.
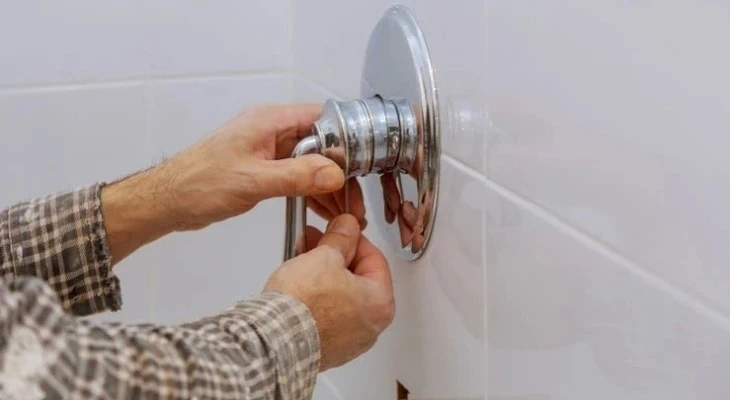
2. Locate the Shower Handle Cap

Modern shower handle designs typically hide screws under a cap or button-shaped cover for a seamless appearance.
Slide the flathead screwdriver between the button and the rest of the handle. Gently push up to lift the button out of place and locate the screws.
In some cases, the handle itself is the cap. Look where the handle meets the escutcheon (the decorative base the handle connects to) and see if you can gently slide the flathead screwdriver between the base and the handle.
If so, carefully push up to pop the handle from the base. The screws to remove the remainder of the shower handle should sit where the handle was.
4. Spray the Screws with WD40 or Calcium Removing Spray
Built-up soap residue and hard water minerals will make it difficult to remove the screws.
If you see a heavy build-up of calcium or mineral deposits around the screws, spray them with the calcium-removing spray. Afterward, you can spray a layer of WD40 on the screws for extra lubrication.
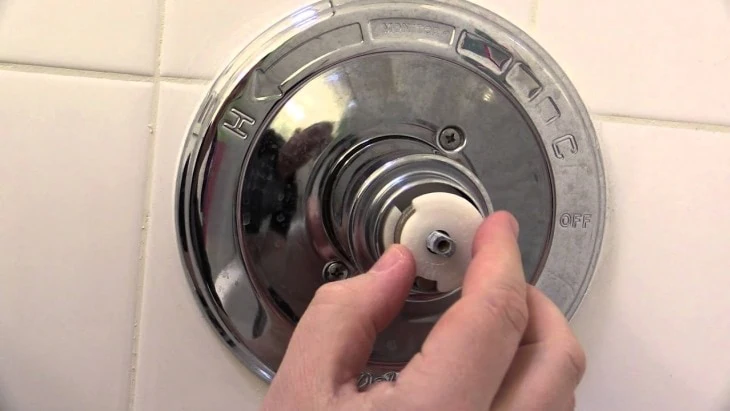
5. Remove the Screws
You’ll have to use your Allen Wrench multi-tool to locate the proper size screwhead for the screws. Note most standard screwdrivers won’t fit the smaller screws used in shower handles.
6. Remove the Shower Handle
After removing the screws, the shower handle should come out. However, you may need to use pliers and the flathead screwdriver to prop the handle out, depending on how snugly the handle fits against the escutcheon.
How to Remove Delta Push-Fit Shower Handles
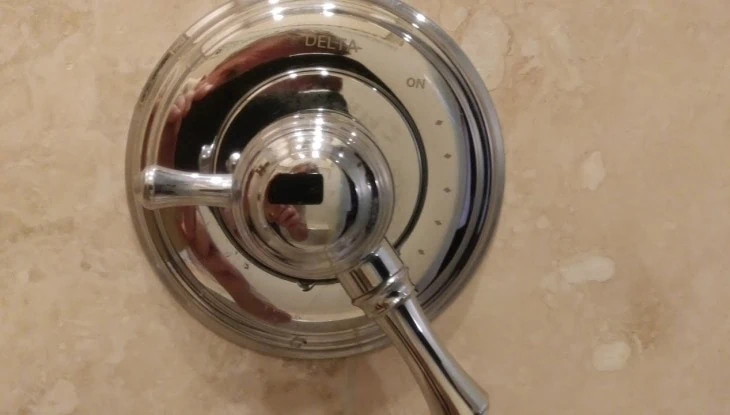
Some bathroom fixture companies, like Delta, have started moving towards push-fit models of shower handles.
However, you’ll want to ensure your Delta handle is actually a push-fit before proceeding – not all Delta shower handles use push-fit technology.
To check if your Delta handle is a push-fit, you can look up the model number on Delta’s website. If you don’t know the model number, you can attempt to remove the handle as if it is a push-fit. If it doesn’t work, it may not be a push-fit-style handle.
To remove a push-fit Delta handle, do the following:
- Align your shower handle with the spout.
- Pull the handle straight away from the faucet towards you.
For a top-mounted handle, you’ll pull up to remove it; side-mounted handles need pulling off via the side. Avoid using tools to pull off the handle, as excess force can damage it. A quick, sturdy pull at the handle should remove a push-fit style handle.
If you don’t have a Delta push-fit model but no screws are visible, you can usually follow the previously covered steps for removing any shower handle with hidden screws.
3 Signs Your Shower Handle Needs Replacing or Removed
1. The Handle is Leaking
A leaking handle may indicate a mineral build-up or a loose-fitting handle. Quickly addressing leaks is critical to prevent water damage and rust in the shower.
You’ll have to remove the handle to take care of any build-up and adjust the handle to sit flush with the escutcheon base.
2. The Water Temperature is Difficult to Adjust
If your shower water seems to fluctuate in temperature or won’t change temperature when turned, you may have a damaged faucet cartridge.
Usually, the faucet cartridge sits behind the shower handle and its base, so you’ll have to remove the handle and escutcheon to access it for repairs or replacement.
3. The Handle Won’t Turn
If the shower handle seems stiff or you can’t easily turn it to adjust the temperature, it likely has build-up or rust that needs removing. You’ll usually have to remove the handle to treat the build-up or rust.
If your shower handle is extremely damaged or you see signs of water damage, like rotting wood or the musty smell of mold, call a plumber to assess the extent of the damage.
If at any point you feel uncertain about your project, reach out to a professional to avoid damaging your shower.