

If you have been staring at your marble tile, scared to make a cut, this article is for you! It is possible to make cuts in marble without chips or breaks. Reach your home improvement goals with a few simple steps for clean marble cuts.
Marble mosaic tile is a popular choice for bathrooms and kitchens. It can be cut into a variety of shapes and arranged in many creative, pleasing patterns. Marble can be difficult to cut without chipping. Use a wet saw with a diamond glass blade to get the cleanest cuts possible. For curved lines, use an angle grinder with a similar blade.
Table of Contents
How Can I Cut Marble Mosaic Tile Without Chipping?

Materials Needed
- Wet tile saw for straight cuts
- Angle grinder for curved cuts
- Diamond blade for both saws
- Socket wrench
- Water
- Ruler
- Pencil
- Straight edge for straight marks
- Compass for curved marks
- A large, thick piece of plywood (for curved cuts)
- Masking tape (optional)
- Safety goggles, earplugs, and a respirator mask
Here are detailed instructions on getting this done.
Mark Your Tile
Use the straight edge and a pencil to make straight marks on your tile. If you need to make a curved piece, use the compass for precise circles! The pencil marks are erasable once you are done with the project.
Prepare Your Tools
A diamond blade for either the angle grinder or wet tile saw will work the best with marble mosaic tile. Look for a glass blade. Glass blades have a very thin edge, which will be less likely to chip your tile.
Once you have found the appropriate blade for your saw, attach it to the saw. Handle the blade carefully so you don’t cut yourself! There is usually a nut on the side of the blade casing.
Remove the nut, then place the blade on the saw. Tighten the nut well with the socket wrench. Check the instruction manual for your saw to make sure the blade is installed correctly.
Put on Safety Gear
Never underestimate the importance of safety! Keep your eyes protected from any airborne dust or particles with a pair of safety goggles that covers the sides of your eyes as well. Wear earplugs to protect against the noise and a respirator mask to keep your lungs free and clear of particles.
Fill the Wet Saw Reservoir
A wet tile saw is a great way to cut back on tile dust! Fill the reservoir in the bottom of the wet saw with clean water until the bottom of the blade is just submerged. You may need to refill the reservoir periodically.
Making a Cut with a Wet Saw
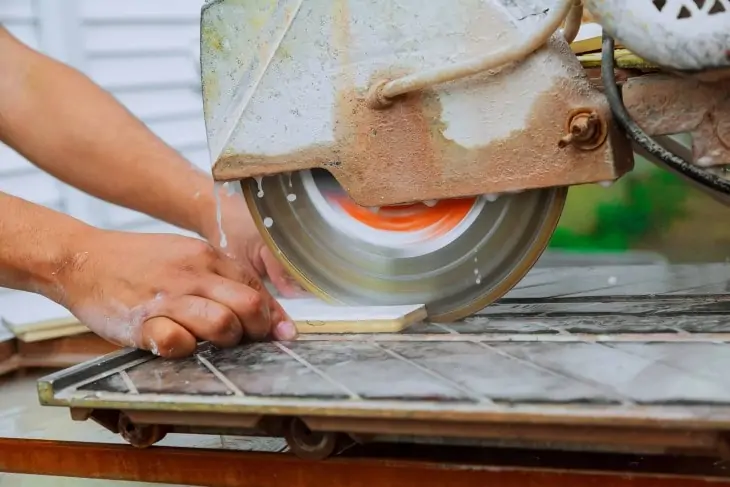
After all that preparation, you are almost ready to make your first cut! There is a metal ledge on the side of the saw called a fence (not related to your usual fence). Line up the fence with the edge of the tile. Adjust the fence as needed until your cutting mark lines up with the saw blade.
Turn the tile face down. Make a one-inch relief cut. Flip the tile over so that it is right side up. Now start at the opposite end from the relief cut. Slowly and carefully cut your way down the tile until you reach the relief cut. Using a relief cut can prevent chipping when you reach the end of the tile.
Turn off the saw before you remove the tile!
Some tile technicians use masking tape to wrap the tile before they make a cut. The tape helps hold the tile together, so it doesn’t jumble or fall into the water reservoir. If you want to use this method, wrap the tile in masking tape, make the marks on the tape, then cut the tile using the method above.
Making a Cut with an Angle Grinder
An angle grinder is a great tool to cut curved pieces of tile. Place a thick piece of plywood under the tile before you cut. Look for a piece of wood that is at least two inches thick. This will keep the tile secure, and prevent cutting through the tile and wood into the surface underneath.
You can use rubber-tipped clamps to hold the tile in place during cutting. Or, create a brace with two pieces of wood to hold the corner steady.
Cut the tile in two passes. For the first pass, push the grinder halfway through the tile on your mark. Follow the mark, and continue to cut halfway through until you have completed tracing the line. Not only will this prevent chipping, but it may also keep your blade from breaking.
Turn off the angle grinder and clear the dust. You are ready for the next pass! Follow the cuts you just made and cut completely through the tile this time. Don’t forget to turn off the grinder when you are done!
I am going to get a glass blade. I wouldn’t have thought of that. I definitely saw blades just for glass tiles. The herring bone marble mosaic I have is like quartz in that is crumbly and the corners break off easily.